
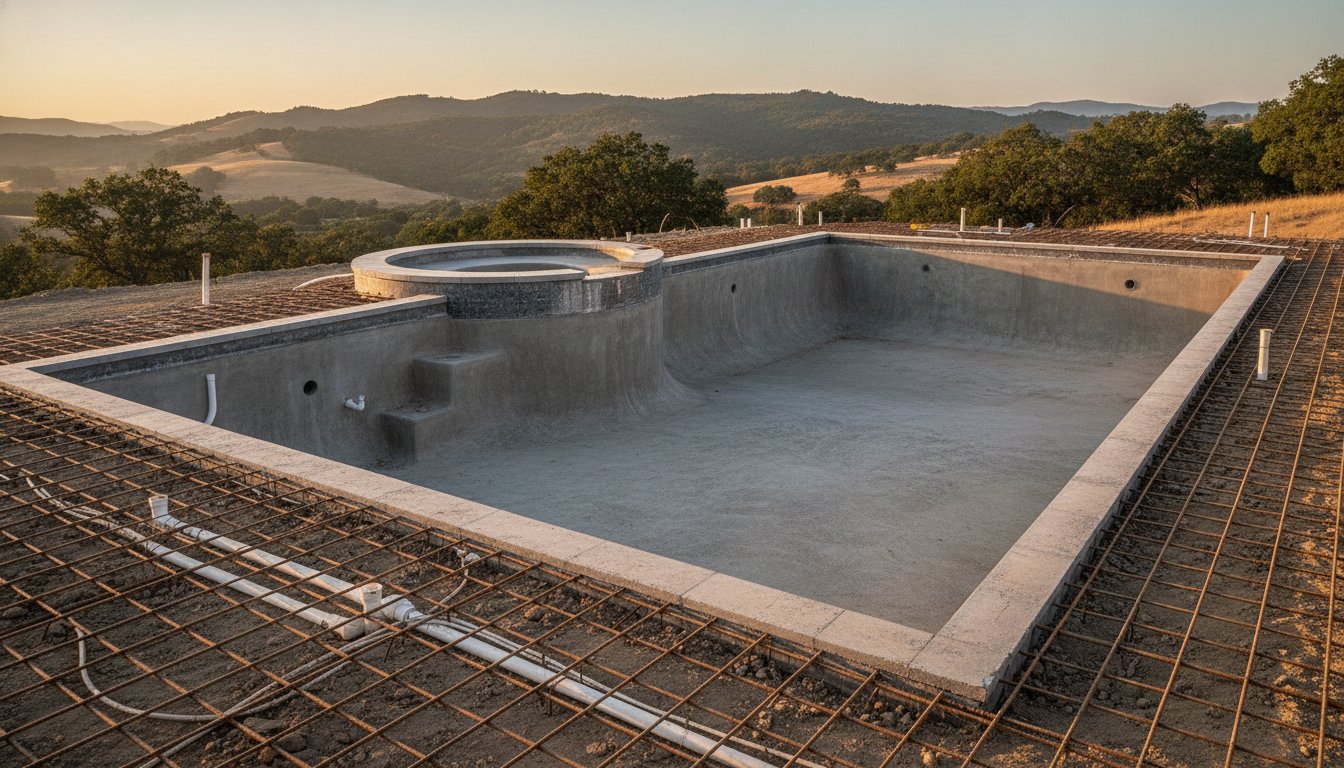
A gunite pool isn't simply a seasonal project; it's a permanent piece of architecture that requires the same precision and patience as a custom home. While the prospect of a "perpetual construction site" in your Sonoma or Napa backyard can feel daunting, understanding the pool building timeline for gunite pools reveals that every week is a calculated step toward structural integrity. It's natural to feel a sense of urgency when you're ready to transform your outdoor living space, yet the unique curing requirements of concrete ensure your investment remains stable for decades.
You've likely wondered why gunite involves a more intensive schedule than other materials or how local permitting might impact your first swim. This guide provides a transparent, phase-by-phase look at the construction journey, offering the clarity you need to move forward with confidence. We'll explore the methodical progression from the first break of ground to the final plastering, including the specific Northern California factors and 2026 Title 24 standards that shape a modern, high-end pool project.
Key Takeaways
- Develop a realistic expectation for the pool building timeline for gunite pools, which generally ranges from 12 to 20 weeks depending on your project's complexity.
- Understand how the permitting and engineering phase sets the foundation for a project that meets strict Northern California standards and Title 24 requirements.
- Appreciate the essential role of the 28-day gunite curing period in establishing a shell that offers legendary durability and design flexibility.
- Learn how the final stages of hardscape integration and interior finishing transition your backyard from a construction site to a polished outdoor retreat.
- Prepare for the startup process and initial water chemistry balancing to protect your investment from the very first day of use.
Phase 1: Design, Engineering, and the Permitting Process
The pool building timeline for gunite pools begins well before a single shovel of earth is moved. While some national estimates suggest a rapid start, the reality in Northern California involves a meticulous pre-construction phase that often spans four to eight weeks. This period is the foundation of the project. It transforms your conceptual vision into a set of precise, engineered documents that satisfy both your aesthetic standards and local safety mandates. Total project duration typically ranges from 12 to 20 weeks, and much of that variability is decided right here in Phase 1.
Custom Design and Site Engineering
In the North Bay, standard designs are a rarity. If you're building on a hillside lot in Sonoma or managing the expansive clay soils common in Napa, your structural blueprints must be site-specific. Engineers focus on seismic stability and soil load-bearing capacity to ensure the pool remains a permanent fixture of your home. This stage also includes detailed utility mapping. Identifying gas, electric, and water lines early prevents the costly delays and safety hazards of accidental strikes during excavation. We also finalize your selections for tile, coping, and interior finishes now. Securing these materials early in the pool building timeline for gunite pools protects the project from supply chain interruptions during later phases. The engineering plans must be rigorous, accounting for the high-velocity application of material, often explored through the art of the cure, which provides the shell with its legendary structural integrity.
The Reality of Northern California Permitting
City and county approvals are the most variable element of any construction schedule. While some builders might claim permits take only a few weeks, Napa and Sonoma county offices in 2026 often require eight to twelve weeks for a thorough review. These departments look for compliance with California's updated Title 24 energy codes and strict safety regulations. If your property is within a managed community in Danville or Alamo, you'll also need to account for HOA architectural review committees. These boards often meet only once a month; this can add a significant layer to the calendar. A reliable builder acts as your advocate during this process. They manage the submission of documents, respond to technical inquiries from officials, and ensure the paperwork moves steadily through the system so construction can begin without unnecessary friction.
Phase 2: Excavation, Steel Reinforcement, and Plumbing
Once the permits are secured, the project moves from paper to earth. This is the most transformative period in the pool building timeline for gunite pools. You'll see heavy machinery arrive to begin the "Big Dig," where the precise dimensions of your pool are carved into the landscape. While national builders might suggest a two-day excavation, the reality in Northern California is often more complex. Our region's unique geography requires a methodical approach to ensure the ground is properly prepared for a lifetime of structural stability.
Excavation Challenges in the North Bay
Homeowners in Napa and Sonoma often face rocky volcanic soils or high water tables that require a more deliberate pace during the dig. Hillside properties demand specialized soil stabilization techniques to ensure the pool remains level and secure for decades. We often utilize over-excavation and backfilling with engineered material to create a stable foundation when the natural soil lacks sufficient structural integrity. Throughout this process, strict adherence to OSHA safety procedures ensures the site remains secure for both the construction crew and your property. This phase typically takes one to two weeks, depending on the specific geology of your backyard.
The Steel Skeleton and Stub-out Plumbing
Following the dig, we install the steel rebar skeleton. This cage provides the essential tensile strength that makes gunite legendary for its longevity and resistance to seismic shifts. Every piece of steel is tied with precision; exact spacing is critical to prevent future structural cracks in the concrete shell. Simultaneously, we install the "arteries" of the system. These include the plumbing and electrical conduits that will eventually power your lights and filtration. In line with 2026 energy standards, we set the stage for high-efficiency heat pumps and pool automation systems that allow you to manage every water feature from a smartphone. This infrastructure is buried deep within the structure, making precision during this phase non-negotiable.
Before the gunite is sprayed, a municipal inspector must verify that the steel and plumbing meet California's rigorous building codes. This inspection is a vital checkpoint in the pool building timeline for gunite pools, confirming that the foundation is safe, bonded, and ready for the structural shell. It's a moment of transition that provides peace of mind, knowing that the unseen components of your project are built to a professional, high-end standard. Once the "green tag" is received from the county, we move toward the most specialized stage of the construction process.
Phase 3: Shooting the Gunite Shell and the Art of the Cure
Shooting the gunite shell represents the most dramatic shift in the pool building timeline for gunite pools. This is the moment your backyard transforms from a structured pit of steel into a recognizable architectural feature. Unlike poured concrete, which requires heavy forms and limits design flexibility, gunite is pneumatically applied at high velocity. This method allows for the seamless creation of freeform curves, deep basins, and intricate underwater features that define a custom luxury pool. The resulting structure is a monolithic shell of immense strength, capable of withstanding the natural shifts of Northern California soil.
What Happens on Gunite Day?
Gunite day is a highly choreographed operation. A specialized crew uses a high-pressure hose to spray the dry mix of sand and cement, which meets water at the nozzle just as it's applied. As the material builds up against the steel rebar skeleton, master finishers use hand trowels to sculpt the fine details. They carve out the steps, tanning ledges, and benches with an eye for both aesthetic harmony and ergonomic comfort. By the end of the day, the pool’s permanent shape is fully realized, and the "skeleton" of the project is finally encased in stone.
The Science of the 28-Day Cure
While the shell looks finished by sunset, the internal chemistry is just beginning. The pool building timeline for gunite pools includes a mandatory 28-day hydration period. It's important to understand that this isn't a "drying" process. Instead, it's a chemical reaction where water molecules bind with the cement to reach the design's maximum PSI strength. Rushing into the interior finishing phase before this cure is complete often leads to plaster delamination or structural hairline cracks later. We respect the science of the material to ensure the longevity of your investment.
You play a vital part in this stage of the journey. For the first seven to ten days, the shell needs to be "watered" two to three times daily. This prevents the concrete from curing too quickly on the surface, which could cause surface fissures known as "checking." Keeping the shell damp ensures the hydration process remains consistent throughout the entire thickness of the wall. While the shell gains strength, the project doesn't stall. We use this time to install perimeter tile, run gas lines for your heater, and complete electrical hookups for your lighting system. This overlapping schedule ensures every day of the cure is used efficiently, moving you steadily toward the final finish.

Phase 4: Coping, Tile, and Hardscape Integration
As the structural shell reaches its full strength, the project transitions into the aesthetic and functional integration of your backyard. This phase of the pool building timeline for gunite pools is where the raw, grey concrete is transformed into a polished retreat. We begin by setting the waterline tile and coping; these elements serve as the transition between the water and the surrounding deck. This work requires a high level of craftsmanship. Every tile must be level and every stone joint must be tight to ensure a seamless finish that stands up to years of use.
Material Selection and Craftsmanship
Your choice of materials defines the character of the space. Natural stone coping provides a timeless, organic feel, while modern porcelain tiles offer a sleek, contemporary edge. If your design includes complex features like an infinity edge or a perimeter overflow, this stage demands additional time for precision leveling. These elements require a tolerance of just millimeters to function correctly. The surrounding deck or patio is also constructed during this window. Whether you opt for hand-laid pavers or decorative stamped concrete, we focus on proper drainage and soil compaction to prevent future settling. If you're envisioning integrated features like fire pits or outdoor kitchens, custom pool design and construction experts ensure these utilities are safely connected and aesthetically unified.
Safety and Final Inspections
Before moving to the final interior finish, the project must meet California’s strict safety mandates. Senate Bill 442 (SB-442) requires that new pools include specific safety features to prevent accidents. These usually include a combination of permanent fencing, pool covers, and door alarms leading to the water. We coordinate the installation of these barriers to ensure they complement your landscape rather than detract from it. Meeting these standards isn't just about compliance; it's about providing a secure environment for your family and guests.
The "Pre-Plaster" inspection is the final regulatory hurdle. A municipal official verifies that all electrical bonding is secure, the plumbing has passed pressure tests, and the safety barriers are in place. This thorough review ensures that every technical detail meets the high standards required for modern California pool construction. Once the inspector provides the final approval, the site is cleaned and prepared for the interior finish. This is the final step before the water begins to flow, marking the near completion of your project.
Phase 5: Interior Finish, Startup, and Education
The final stage of the pool building timeline for gunite pools is a precise exercise in timing and chemistry. After weeks of structural work and hardscape integration, the interior finish provides the water-tight seal and the vibrant color that defines the pool's aesthetic. This phase is relatively brief compared to the structural stages, but it requires absolute focus on environmental conditions. A calm, wind-free day is ideal to ensure that no dust or debris settles into the fresh surface before the water begins to rise. It's the moment when the architectural shell finally becomes a functional aquatic environment.
Applying the Final Surface
Choosing your interior finish is a balance between texture and longevity. Standard white plaster offers a classic look and can be applied in a single day. In contrast, premium finishes like quartz or Pebble Tec involve a more labor-intensive process; they often require a second day to wash and expose the decorative aggregates. Regardless of the material, the site must remain pristine to prevent staining. Once the finish is applied, the pool must be filled immediately to prevent the surface from drying or cracking under the California sun. You shouldn't stop the water until it reaches the middle of the waterline tile, as stopping early can leave a permanent ring on the new surface.
Startup and Technology Handover
Filling the pool is just the beginning of the startup phase. For the first 14 days, the new finish requires daily brushing to remove plaster dust and ensure a smooth, durable surface. This is also when we calibrate your water chemistry to protect the finish from scaling or etching. Modern luxury pools in 2026 are more than just water; they're sophisticated systems. We'll walk you through your automation app, showing you how to control your heat pump, lighting, and water features directly from your smartphone. This digital integration ensures that managing your pool is as seamless as the design itself.
The final step is "Pool School." This is a personalized session where we guide you through the operation of your equipment and the nuances of your specific build. We believe in empowering our clients to feel confident in their new environment. For those who prefer a completely hands-off experience, transitioning to Paradise Pools, Inc.’s weekly maintenance service ensures your investment is preserved by experts who understand the unique requirements of gunite structures. With the chemistry balanced and the technology mastered, your journey from breaking ground to your first swim is complete. You're now ready to enjoy a space designed for a lifetime of memories.
Building Your Backyard Legacy with Confidence
Constructing a custom gunite pool is an investment in both your property's value and your family's quality of life. By understanding the pool building timeline for gunite pools, you can navigate the permitting hurdles and the essential 28-day curing phase with a sense of calm and clarity. This methodical progression ensures that every structural element, from the initial steel reinforcement to the final interior finish, is executed with the precision your home deserves.
A successful build requires more than just a schedule; it demands a partner who understands the unique geological and regulatory landscape of the North Bay. Paradise Pools, Inc. brings over 45 years of Napa Valley expertise to every project. As a family-owned and operated firm since 1978, we specialize in complex hillside engineering and the meticulous craftsmanship required for a high-end finish. We manage the intricate details so you can focus on the memories ahead.
When you're ready to transform your outdoor space into a permanent retreat, start your custom pool journey with a Paradise Pools, Inc. consultation. Your vision is within reach, and we're here to guide you every step of the way.
Frequently Asked Questions
Can we build a gunite pool during the rainy season in Napa Valley?
Yes, construction can proceed during the rainy season, though specific phases like excavation and plumbing may face short-term delays. Heavy machinery requires stable ground to operate safely without damaging your landscape. Once the gunite shell is shot, rain actually assists the hydration process by keeping the concrete damp. We monitor local weather patterns closely to schedule high-impact work during dry windows while maintaining overall project momentum.
Why does a gunite pool take longer than a fiberglass or vinyl liner pool?
A gunite pool is a custom-engineered architectural structure built on-site rather than a pre-manufactured shell. The pool building timeline for gunite pools includes a mandatory 28-day curing period, which is essential for the concrete to reach its maximum PSI strength. Fiberglass or vinyl pools bypass this structural curing phase, but they lack the design flexibility and permanent longevity that define a high-end gunite installation.
How much time should I budget for the permitting process in Sonoma County?
You should budget approximately 8 to 12 weeks for the permitting phase in Sonoma County. Local building departments conduct thorough reviews to ensure compliance with seismic safety standards and California's 2026 Title 24 energy codes. While this stage requires patience, it's a vital step that ensures your pool is built to the highest legal and safety standards of the region.
What is the most common cause of delays in the pool construction timeline?
Municipal permit backlogs and unforeseen geological conditions are the primary causes of schedule shifts. While weather is a factor, waiting for county inspectors to approve steel or plumbing can add days to the calendar. Encountering underground rock or high water tables during excavation can also require specialized equipment and extra time to ensure the structural integrity of the foundation remains uncompromised.
Do I need to be home during every phase of the pool construction?
You don't need to be present for the vast majority of the construction process. Our team manages the crews, coordinates inspections, and oversees site safety independently. We recommend being home for the initial layout to confirm the pool's position and for the final "Pool School" session. This allows us to handle the technical execution while you focus on your daily professional and personal commitments.
When is the best time of year to start my pool project to be ready for summer?
Late fall or early winter is the ideal time to initiate the design and permitting phase. Because the pool building timeline for gunite pools typically spans 12 to 20 weeks, starting in November or December accounts for potential winter rain and permitting windows. This strategic head start ensures your backyard is polished and the water is balanced in time for the first warm days of May.
How long after the gunite is sprayed can I walk on the pool floor?
You can typically walk on the gunite shell within 24 to 48 hours after the application. The concrete gains enough initial strength during this window to support foot traffic for the mandatory daily watering process. However, the shell remains in a sensitive chemical state. You should avoid moving heavy furniture or equipment into the pool area until the full curing period is complete and the interior finish is applied.
What happens if we hit rock during the excavation phase?
Encountering rock requires a transition from standard buckets to specialized hydraulic hammers to carve out the pool's shape. This is a common occurrence in the volcanic soils of the North Bay. While this process adds some time to the excavation phase, it results in an incredibly stable, non-shifting foundation. We adjust our approach immediately to maintain precision without compromising the structural blueprints of your custom design.


